Per-user multi-factor authentication– Planning and Implementing Authentication
If MFA was configured in your tenant before October 2019, it may have been configured using the legacy MFA scheme. Prior to newer technologies, MFA was enabled on a per-user basis by manually updating each user’s account to enforce the use of MFA.
Prior to implementing either Microsoft-managed security defaults or Conditional Access policies, you will need to disable the legacy per-user MFA. Having per-user MFA enabled while configuring a Conditional Access policy that prompts for MFA may cause unintended or unexpected MFA prompts.
To disable per-user MFA, follow these steps:
- Navigate to the Microsoft 365 admin center (https://admin.microsoft.com).
- Expand Users and select Active users.
- Select Multi-factor authentication.
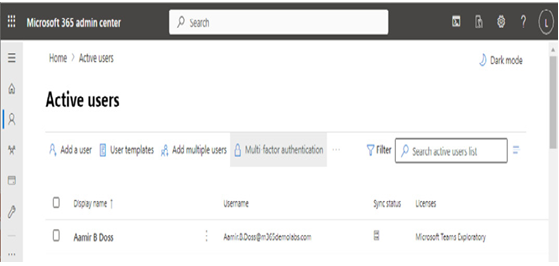
Figure 7.7 – The Active users page
- If your tenant already has Conditional Access policies, you may need to select the Legacy per-user MFA link to launch the legacy MFA page.
- On the Multi-factor authentication page, configure the per-user MFA status to Disabled for users that have Enforced or Enabled set. You can select multiple users but can only multi-select users that have the same MFA status type.
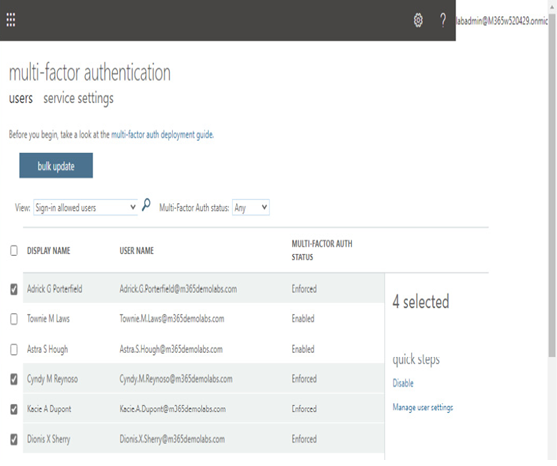
Figure 7.8 – Selecting users
Once per-user MFA is disabled, you can configure the security defaults or the Conditional Aaccess policies.
Security defaults
For most organizations, security defaults are a good choice for configuring broad baseline security policies. Security defaults make the following security changes:
• Requiring all users to register for MFA
• Requiring administrators to perform MFA upon sign-in
• Requiring users to do MFA when necessary
• Blocking basic authentication and other legacy authentication protocols
• Requiring administrators to perform MFA when accessing privileged resources, such as the Azure portal, Azure PowerShell, or the Azure CLI
Security defaults can be modified by users with the Global Administrator, Conditional Access Administrator, or Security Administrator role. Security defaults can be enabled or disabled using the following process:
- Navigate to the Azure portal (https://portal.azure.com).
- Select Azure Active Directory.
- Under Manage, click Properties.
- Scroll to the bottom of the page and click Manage security defaults.
- On the Security defaults flyout, select either Enabled or Disabled and click Save.
If you are going to configure Conditional Access policies, you should disable Security defaults. If you are not going to configure Conditional Access policies, you should enable Security defaults.
FURTHER READING
For more information on the impact of security defaults, see the following: https://learn.microsoft.com/en-us/azure/active-directory/fundamentals/concept-fundamentals-security-defaults.