Microsoft Authenticator app– Planning and Implementing Authentication
Many administrators and users are already familiar with the Microsoft Authenticator mobile device app, using it for MFA. The Authenticator app can also be used as a password-less sign-in option. When used as a password-less option, Microsoft Authenticator can use number-matching, where the sign-in screen displays a number that the user enters and confirms with their PIN or biometric data (see Figure 7.3):
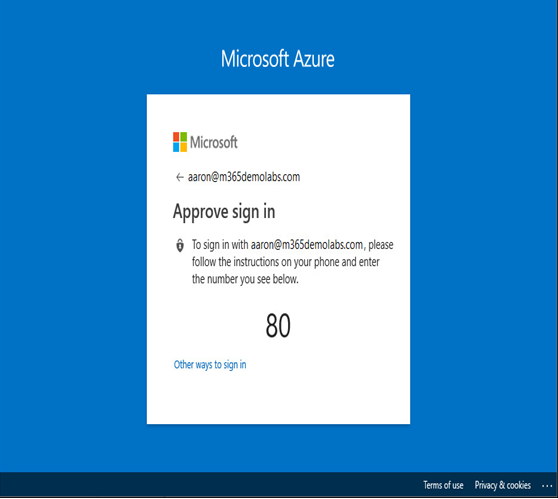
Figure 7.3 – Password-less authentication dialog with Microsoft Authenticator
The data flow using the Authenticator app follows the same general pattern as Windows Hello, as shown in Figure 7.4:
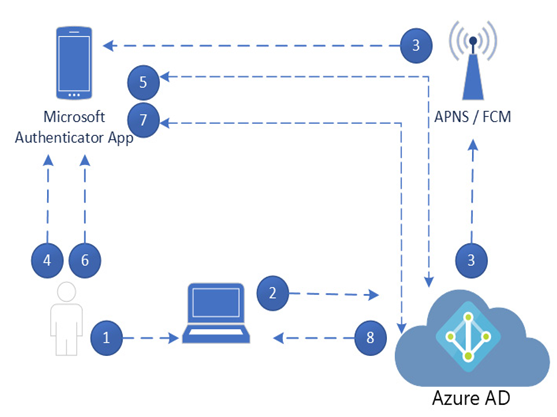
Figure 7.4 – Microsoft Authenticator authentication sequence
The steps are as follows:
- The user enters their username on the device.
- Azure AD detects that the user is configured for password-less authentication.
- Azure AD sends a notification to the Authenticator app on the user’s configured Apple or Android device.
- The user launches the Authenticator app.
- The Authenticator app connects to Azure AD and receives the proof-of-presence challenge and nonce.
- The user completes the challenge on their mobile device and then confirms their identity with biometric data or a PIN, unlocking the private key.
- The private key is used to sign the nonce and the Authenticator app returns the data to Azure AD.
- Azure AD decrypts the data with the user’s public key, performs validation, and then returns the sign-in token to the original device where the login was started.
While WHFB has specific hardware requirements (such as a Windows Hello-compatible camera or fingerprint reader), the password-less Microsoft Authenticator has a very low barrier to entry. The Authenticator app is free for iOS and Android devices and works not only with Microsoft 365 services but also with any service that supports a soft-token app or device.