Configuring FIDO2– Planning and Implementing Authentication
When setting up FIDO2-based authentication, you’ll follow a process similar to Microsoft Authenticator – updating the authentication policy to allow the method and then instructing users to self-register their security keys.
Configuring the authentication policy
To enable users to sign in with FIDO2 security keys, you need to configure the authentication policy. Configuring the policy requires an account with the Global Administrator or Authentication Administrator role.
- Navigate to the Azure portal (https://portal.azure.com).
- Select Azure Active Directory | Security | Authentication methods and then select Policies.
- Select Microsoft Authenticator.
- On the Enable and Target tab of the FIDO2 security key settings page, slide the Enable toggle to on.
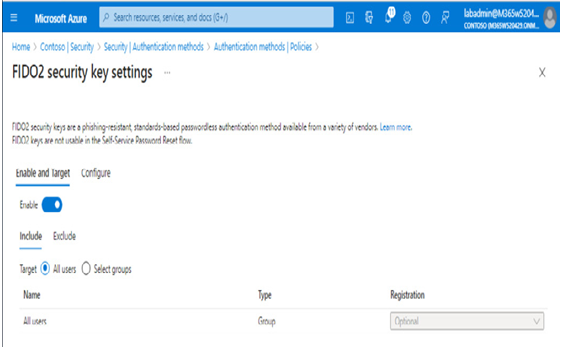
Figure 7.22 – Enabling Microsoft Authenticator
- Using the Include and Exclude tabs, specify which users the policy settings will apply to. Select the All users radio button to include all users in the policy or choose the Select groups radio button to specify which groups will be included or excluded.
- Click Save to update the policy configuration.
The next step is to instruct users to register the security keys.
Registering devices
Like Microsoft Authenticator-based authentication, FIDO2 authentication requires end users to register the compatible device they wish to use for authentication.
NOTE
In order to register a FIDO2 security key, the user must already have an Azure AD MFA method configured. If they do not have one, they must add one (such as Microsoft Authenticator or SMS). If that is not possible, an administrator can issue a Temporary Access Pass (TAP) to allow the user to complete registration. For more information on configuring a TAP, please see the following: https://learn.microsoft.com/en-us/azure/active-directory/authentication/howto-authentication-temporary-access-pass.
To register a FIDO2 security key, users must follow these steps: - Navigate to https://myprofile.microsoft.com or, from the Microsoft 365 portal, expand the profile icon, and select View account.
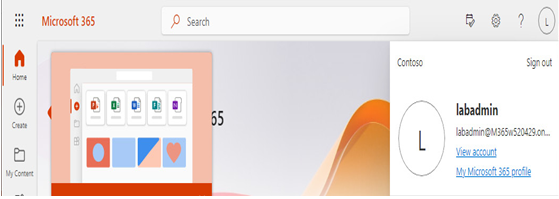
Figure 7.23 – Accessing the user’s account
- Click Security Info.
- Select Add method and click Security key.
- Select either USB device or NFC device.
- Ensure the key is ready and click Next.
- In the dialog box, create and enter a PIN for the security key and then perform the required gesture (biometric/touch) to confirm.
- Enter your name for the key in Name and click Next.
- Click Done.
After the key has been registered, users can sign in to Azure AD using their security key. On the Azure sign-in page, after entering a username, users can select the Sign in with Windows Hello or a security key option, which will cause the browser to issue a prompt to insert the key, as shown in Figure 7.24:
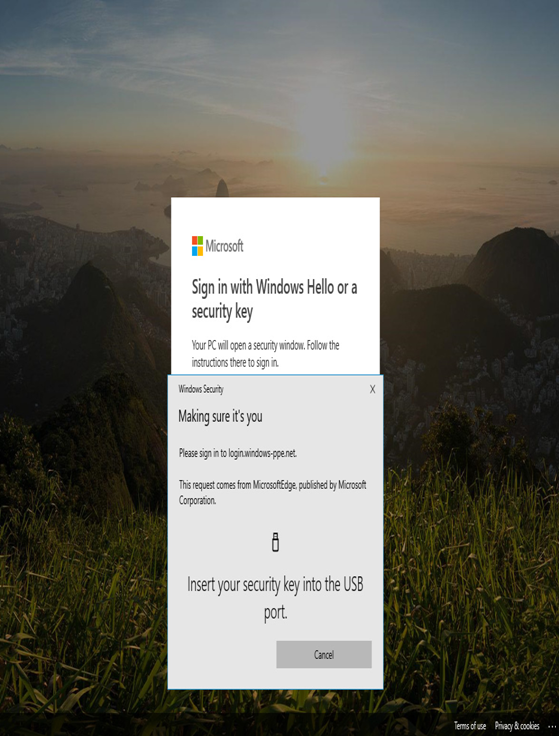
Figure 7.24 – Sign in with Windows Hello or a security key
Next, we’ll look at configuring self-service password reset (SSPR).
Implementing and managing self-service password reset
SSPR is a feature that allows users to change or reset passwords without administrator or service desk involvement. Self-service passwords can be configured for Azure AD cloud-only environments as well as enabling SSPR of hybrid identity through Azure AD Connect’s Password Writeback feature.